Copperline opens a single window: the emulated display presented at a TV-like 4:3 aspect ratio, above a status bar with the machine’s controls. The window scales continuously when resized.
The display defaults to buffered, synchronised presentation (strict FIFO
vsync) on all desktop platforms. Video Settings -> VSync changes this
immediately; it is also in the configuration screen’s A/V & Emu -> Display
category and saved as [display] vsync. PAL output is roughly 50 Hz, so
motion can still have an uneven cadence on a fixed 60 Hz or 120 Hz display,
where some Amiga frames stay on screen for an extra refresh. VSync prevents
tearing, but it does not make those refresh rates match or change the
emulated machine’s speed.
On native Wayland, redraws also follow compositor frame callbacks. This allows the compositor to throttle a hidden window and schedule visible updates, including when VSync is off.
For display diagnostics, launch with RUST_LOG=info to log the selected
presentation mode, supported modes, GPU, graphics backend, and window
system. The window-system field distinguishes native Wayland from an X11
window running through XWayland. Add COPPERLINE_PRESENT_PROFILE=1 to log
each presentation attempt: its emulated frame number, interval since the
previous attempt, time acquiring/uploading the surface, time recording draw
commands, and time submitting/presenting. submitted=false means no frame
was submitted; -1 marks a stage that was not reached. These are host CPU
timings, not GPU execution or physical display timestamps. They complement
the performance overlay, whose FPS measures emulated frames.
On Windows, if the default graphics backend selects a CPU software renderer,
Copperline tries OpenGL and uses it when its adapter is not reported as a CPU
renderer. This avoids a slow software DirectX path on systems with accelerated
OpenGL, including some virtual machines. If OpenGL cannot initialise or also
selects a CPU renderer, Copperline rebuilds the renderer using the original
backend. If that also fails to initialise, it reports the startup error.
Setting WGPU_BACKEND or WGPU_ADAPTER_NAME disables this automatic fallback
so explicit selections still apply. The startup log records any switch.
Keyboard shortcuts
The app shortcut modifier is Cmd on macOS and Alt on Linux/Windows.
| macOS | Linux/Windows | Action |
|---|---|---|
Cmd+Q | Alt+Q | Quit (also the menu’s last row; a calibrated gamepad’s optional Quit hotkey, held, quits too) |
Cmd+E | Alt+E | Open / close the menu (also the status bar’s hamburger button); releases a captured mouse |
Cmd+S | Alt+S | Save a screenshot (copperline-screenshot-<YYYYMMDDHHmmSS>.png in the screenshots folder; the on-screen confirmation overlay is not part of the saved image) |
Cmd+R | Alt+R | Start / stop a video-with-audio recording (below) |
Cmd+Shift+R | Alt+Shift+R | Start / stop an input recording (below) |
Cmd+Shift+V | Alt+Shift+V | Paste as keystrokes: type the host clipboard’s text on the emulated keyboard (also Input Settings -> Paste as Keystrokes) |
Cmd+Shift+G | Alt+Shift+G | Save the last few seconds of the display as an animated GIF (copperline-clip-<YYYYMMDDHHmmSS>.gif in the recordings folder; see Saving a GIF clip) |
Cmd+Shift+S | Alt+Shift+S | Save a state (copperline-state-<YYYYMMDDHHmmSS>.clstate in the states folder) |
Cmd+Shift+L | Alt+Shift+L | Open the Load State browser |
Cmd+1..Cmd+9, Cmd+0 | Alt+1..Alt+9, Alt+0 | Quick-save to numbered slot 1-10 |
Cmd+Shift+1..Cmd+Shift+0 | Alt+Shift+1..Alt+Shift+0 | Quick-load from that slot |
Cmd+D | Alt+D | Swap the first drive with a queued playlist to its next disk |
Cmd+G | Alt+G | Capture / release the host mouse (clicking the display also captures) |
Cmd+B | Alt+B | Toggle the Debug layout |
Cmd+Shift+B | Alt+Shift+B | Press the freezer cartridge’s button: enter the HRTMon monitor ([cartridge] model, see Configuration) |
Cmd+K | Alt+K | Toggle the Console in Debug layout |
Cmd+J | Alt+J | Toggle joystick input mode: gamepad / keyboard (also the status-bar icon) |
Cmd+M | Alt+M | Turn the monitor bezel off, or back on to the chosen front (Video Settings -> Monitor Bezel picks it; [display] bezel sets the start-up value) |
Cmd+Shift+A | Alt+Shift+A | Cycle the audio output: Default, each host device, then Disabled (also Audio Settings -> Audio Output) |
Cmd+A | Alt+A | Cycle Paula’s audio filter: auto, on, off (also Audio Settings -> Audio Filter) |
Cmd+Shift++ / Cmd+Shift+- | Alt+Shift++ / Alt+Shift+- | Raise / lower the parallel-port sampler input gain (only when a sampler is attached; also Parallel Port -> Sampler Gain) |
Cmd+Shift+> / Cmd+Shift+< | Alt+Shift+> / Alt+Shift+< | Raise / lower the host mouse sensitivity (also the launcher’s Input tab) |
Cmd+F | Alt+F | Toggle fullscreen on / off |
Cmd+Shift+F | Alt+Shift+F | Show / hide the status bar |
Cmd+P | Alt+P | Toggle the performance overlay ([display] perf_overlay sets the start-up value) |
Cmd+W | Alt+W | Toggle Warp Speed (turbo) on / off; one press also ends every warp a control client, a GDB client, the guest, or a boot phase engaged |
Cmd+Shift+W | Alt+Shift+W | Cycle the Warp Speed limit: 2x, 4x, 8x, 16x, Max |
Cmd+Z | Alt+Z | Rewind the machine one step (needs [emulation] rewind or Emulation Settings -> Rewind) |
Esc | Esc | Close an open menu or overlay panel (in Debug controls, return to Play); otherwise passed through to the Amiga |
Ctrl+Amiga+Amiga | Ctrl+Amiga+Amiga | Keyboard reset (warm reboot) |
Host modifiers that are passed through to the emulated keyboard map onto
the Amiga keyboard: Alt becomes Amiga Alt, Cmd/Super becomes the left/right
Amiga keys, and left Ctrl becomes Amiga Ctrl, so Ctrl+Amiga+Amiga is
typed naturally. The Amiga keyboard has no right Ctrl, so host right Ctrl
also acts as the right Amiga key -- handy on PC/laptop keyboards that lack
a right Super/Win key. Host F11 types the Amiga Help key, and the ISO key
between left Shift and Z types the Amiga key in the same position.
All other keys reach the emulated machine through a bit-timed model of the
keyboard’s microcontroller. It clocks each transition into CIA-A’s serial
register over the emulated KCLK/KDAT lines, with the real handshake,
power-up stream, and recovery protocol, so software that drives the
keyboard hardware directly works too. Ctrl+Amiga+Amiga runs the
authentic reset protocol (reset warning, then KCLK held low), so the
reboot lands a fraction of a second after the chord, as on real hardware.
During a netplay session only a few of these shortcuts apply; see Netplay controls.
Keyboard and controller navigation
Everything the mouse can reach in the launcher, the menu, the status bar and the overlay panels can be reached with the arrow keys or a controller.
The arrows move the focus, which lights the control it is on. Return (or
the pad’s fire button) works it; Esc (or the pad’s second button) steps
back out -- out of an open setting, then the page, then the surface.
Left and right move along the row, up and down to the row above or below;
at the edge of a surface the focus stays where it is. Controls that
cannot be pressed are skipped.
| Control | Return / fire |
|---|---|
| Buttons, tabs, the close gadget | Presses it |
| Tick boxes and cover art | Ticks it |
| Text boxes | Opens it for typing |
< value > settings | Opens it; left and right change the value, Return closes it |
| Volume slider | Opens it; left and right move it |
Lists -- the games, the favourites, the host’s disks -- are walked with up and down, which move the list’s own selection and scroll it. Right steps to the tick beside a row and then out of the list; left leaves it.
Stepping down off the foot of a surface reaches the status bar, and up returns. Left out of a settings page returns to the category button that opened it, and right opens that button’s page. Walking off the bottom of the menu closes it and leaves the focus on the menu button.
Clicking anything hides the focus and moves it to where the pointer pressed, so going back to the keyboard resumes from there. While the focus is shown the pointer highlights nothing; moving the mouse hides the focus again.
A controller drives all of this with its d-pad, fire and second button. Its Menu button is the way in from a running machine, and the way out too: the menu’s last row is Quit, and the Menu button held quits -- unless the pad’s calibration bound a separate Quit control, which then owns the hold instead.
The inspectors of the Debug workspace -- the
debugger, Frame Analyzer and Console -- are not walked this way. There
Esc leaves a text field first and then returns to Play, and the pad’s
second button closes the inspector in front.
Status bar
The status bar is a 44-pixel strip below the display. Cmd+Shift+F /
Alt+Shift+F or Video Settings -> Status Bar hides it entirely. From
left to right it holds:
LED block. PWR and FDD always. A green HDD activity LED appears on machines with a hard-disk controller (Gayle or A4000 IDE, a SCSI adapter, a Lide board, or the SF2000 SD controller) or a host-folder filesystem mount (
[[filesys]]), and lights while either is accessed. A blue CD activity LED appears on the CDTV and CD32 and lights while the drive reads data or plays CD audio. On a machine whose CD drive is a SCSI CD-ROM unit, the CD LED shows CD-DA playback and the unit’s data reads light the HDD LED with the rest of the SCSI bus. Small digital counters show the current floppy and CD tracks, in green and blue respectively. A machine with only one kind of removable drive gets one full-size counter; a machine with both gets two vertically stacked counters, and a zero-floppy CDTV/CD32 does not show an empty FDD counter. When a built-in CD controller and an expansion CD-ROM are both fitted, the CD LED, counter, and media buttons stay assigned to the built-in drive. The PWR LED is lit whenever the machine is powered and follows the guest’s /LED line as an A500 rev 6 or later board does: full brightness while the line is engaged (Paula’s analogue filter on), dimmed -- not extinguished -- once the software releases it. It follows the pin itself, so the Audio Filter menu override changes what you hear, never the LED.Per-drive floppy controls. Every connected drive gets a disk button (marked with the drive number) that opens a file dialog -- multi-select several images to queue a swap playlist for that drive -- plus a swap button that cycles to the next queued disk and an eject button. Swap and eject grey out when there is nothing to swap to or eject. With three or four drives the clusters stack two-up. A bay driving a physical floppy drive keeps its numbered disk button, so you can see the drive is there, but loading, swapping and ejecting do nothing for it -- the disk is in a real drive, and changing it is done by hand (see Physical floppy drives (FluxBridge)).
CD controls on machines with a CD drive (CDTV, CD32, or a SCSI CD-ROM unit): a CD button that loads (or swaps) a CD image (
.cue/.iso/.nrg/.chd) with the proper media-change notification, and a CD eject button. These do not appear on machines without a CD drive.Keyboard toggle (just left of the joystick toggle): a small keyboard icon, lit while the on-screen Amiga keyboard is up. Click it to show or hide it (see On-screen keyboard).
Joystick toggle (just left of the volume control): a gamepad or keyboard icon showing which source drives the joystick port. Click it to flip between gamepad-only and keyboard joystick emulation; see Controller ports.
Volume slider: drag, or scroll the mouse wheel over it for 5% steps. Clicking the speaker beside it mutes; clicking it again restores the volume it muted from. Moving the slider while muted unmutes at the new level.
Hamburger menu button: opens the pop-up menu (below).
Camera button: saves a screenshot (same as
Cmd+Son macOS orAlt+Son Linux/Windows).Pause / power / reboot buttons. Pause freezes emulation while staying powered; power cold-boots (reinitialising RAM with the Memory page’s Power-on fill policy) or powers off back to the test screen; reboot is a warm reset.
On-screen keyboard
The keyboard button in the status bar, or Input Settings -> On-Screen Keyboard, draws an Amiga keyboard in a strip between the display and the status bar. The window grows to make room for it: the picture keeps its size, the canvas gets taller, and hiding the keyboard gives the height back. A window you have resized yourself keeps its size, and the display reflows into it as usual.
It is an A600 -- the one Amiga keyboard with no numeric keypad, so the
whole machine fits the window’s width at a usable cap size. Clicking a cap
sends that key’s rawkey to the emulated keyboard MCU over the same
authentic serial protocol a host keystroke uses, and is recorded the same
way, so on-screen keys are captured by --record-input and replay from the
resulting --script file. The two keyboards are independent holders of the
same key: pressing a cap the host keyboard is already holding down changes
nothing for the machine, and the key comes up only when the last of the two
lets go.
The keyboard reaches the keys a host keyboard may lack -- Help, both
Amiga keys, and the #/~ key beside Return -- and lets you drive a
session entirely with the mouse.
Qualifiers latch. So that chords can be entered with sequential clicks, Ctrl, both Shifts, both Alts and both Amiga keys stay down when clicked: click one and it is held for the next keystroke, then released with it. Click it twice in quick succession to lock it down until you click it again; click a locked one to let it go. Press and hold one instead, and it behaves like the real key, coming up when the button does. A latched qualifier is drawn with an orange ring, a locked one filled orange.
Ctrl+Amiga+Amiga is typed by latching the three, as any other chord is. The moment the chord completes, the keyboard lets go of all three -- the MCU’s reset protocol is already running, and qualifiers still held would be reported held again through the power-up stream.
Caps Lock carries a lamp in the corner of its cap, driven by the keyboard MCU itself rather than by the clicks, so it follows a save-state load or a guest that toggles the key in software.
UK/US legends. The chip marked UK/US in the cursor notch swaps the five caps a US A600 prints differently (
2,3,', and the two keys a US machine ships blank). It changes what the caps say, not what they send: the guest’s own keymap decides that.The X chip above it puts the keyboard away, the same as the status bar button. It sits in the slot farthest from the cursor keys, so a missed arrow cannot fold the keyboard away mid-game.
Performance overlay
Cmd+P (macOS) / Alt+P (Linux/Windows), Video Settings -> Performance, or
[display] perf_overlay = true shows a live emulation-performance readout
in the top-right corner of the display, one line per data point at the
menu’s font size (it follows Menu Size), refreshed twice a second:
| Line | Meaning |
|---|---|
50.0 fps | Emulated video frames retired per host second: 50 (PAL) or 60 (NTSC) when the machine holds real time, lower when the host cannot keep up, far higher under Warp Speed |
x1.00 | Speed factor: emulated seconds advanced per host second (the effective multiplier under Warp Speed) |
emu 3.2 ms | Host milliseconds of emulation work per emulated frame, pacing sleeps excluded |
host 16% | Share of host wall time spent emulating. In real-time mode this is the share of the frame budget (20.0 ms PAL, 16.7 ms NTSC) used per frame |
audio 148 ms | Live audio output lead -- the cushion that absorbs host scheduling hiccups (steady state is about 150 ms) |
xrun 0 | Audio underrun frames per second: the audible symptom of the host falling behind |
slip 0 | Times the pacer reset its host-time target after exceeding the catch-up limit (for example, after a host stall), since the last guest reset |
Copperline never skips frames to keep pace: when the host cannot sustain
real time the machine slows down (fps and the speed factor fall below
nominal while host sits near 100%). After a long stall, the pacer resets
its host-time target and increments slip; guest execution continues from
the same point. Under Warp Speed the presentation shows one frame per
burst, but every emulated frame is still computed.
Like the transient message overlay, the readout is painted into the
presentation only: screenshots, frame dumps, and recordings never include
it. While a video recording is running the block steps below the REC
badge. COPPERLINE_PERF_OVERLAY=1|0 overrides the config for a single
run, and --perf-overlay shows it from the command line; the launcher’s
Perf overlay row (A/V & Emu, Display) makes it stick. The same
counters are exported through the control protocol’s status reply for
headless runs (see Control protocol (CCP)).
Guest debug overlay
Guest programs (such as those using the vscode-amiga-debug template) can draw
debug shapes and text on the screen with the uaelib trap helpers
(debug_rect, debug_filled_rect, and debug_text; see Direct executable launching (--run)). They stay
until debug_clear removes them. Their coordinates are in a virtual 768x576
space mapped across the active display area, so they follow the autocrop and
scaling settings. The debug overlay is drawn beneath the host UI (status
bar, OSD, performance overlay) and affects only live window presentation;
screenshots, frame dumps, and video recordings exclude it. Disabling
[emulation] uaelib removes the uaelib trap entirely.
Drag and drop
Disk images can be dropped anywhere on the emulator window:
Floppy images (ADF/ADZ/DMS/IPF/SCP, plain or gzip packed): with one connected drive the disk is inserted immediately. With several, a drive chooser opens over the display -- click a drive, press its position in the list (
1-4), or pressEscto cancel. Dropping several floppies at once queues them all as the target drive’s swap playlist, exactly like a multi-selection in the disk dialog. A dropped.zipis taken for a WHDLoad package (below); load a zip-packed disk image through the drive’s disk button instead.CD images (
.cue/.iso/.nrg/.chd) mount in the machine’s CD drive (CDTV, CD32, or a SCSI CD-ROM unit), with the media-change notification. A.chdis read to see what it holds: one made with chdman’screatehdis a hard-disk image and is treated as such below.WHDLoad packages (
.lha,.lzh,.zip, or a bare.slave) reboot the machine straight into the game through the WHDLoad booter, keeping any explicit machine choices. Dropped on the configuration screen they fill the WHDLoad page’s game field instead; that screen refuses every other kind of drop.Hard disk images and Kickstart ROMs (
.hdf,.hdz,.vhd,.img, a hard-disk.chd,.rom) are not accepted as drops. Configure hard disks in the machine configuration screen. To replace a running machine’s ROM and cold-reset it, use Load Kickstart ROM... from the menu.
During a netplay session only the host can drop disks, and only floppy images; they go to the first connected drive.
The chooser opens after the drop rather than offering per-drive drop targets because the windowing layer reports file drops without a cursor position. Drops are not delivered at all under native Wayland (X11 and XWayland work).
Menu, tool windows, and overlay panels
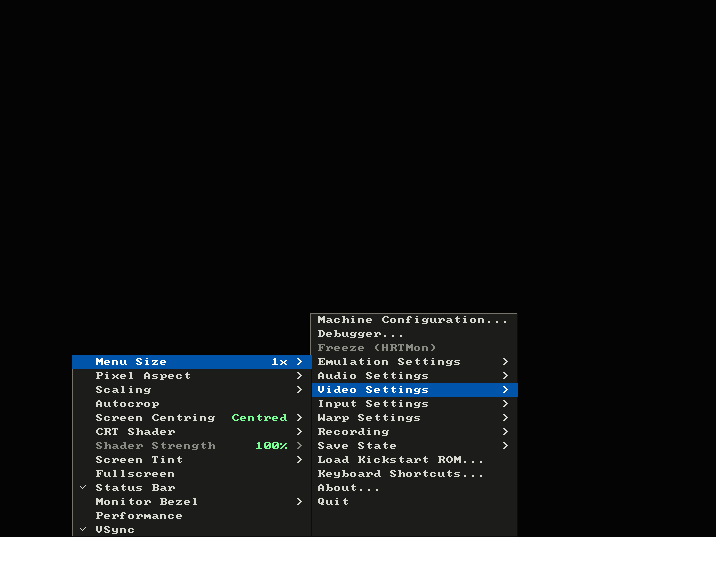
The menu, with a category open beside it.
The hamburger button at the right of the status bar opens the menu, as does
Cmd+E / Alt+E. It grows upward from the status bar and dims the picture
behind it, so the menu stays readable over a busy picture. The dimming is a
window effect: it never appears in a screenshot, a frame dump, or a
recording.
The top level holds the tools, then a category per area of the machine,
then Load Kickstart ROM..., Keyboard Shortcuts..., About...,
and Quit at the foot. A category is marked > and opens a list of its
own beside it; a setting with more than two values opens a further list of
those values with the one in force ticked, and a setting that is simply on
or off is ticked in place. Categories with nothing to offer are not shown
at all: the serial port unless it is in MIDI mode, the parallel port
unless a sampler is on it, and the PCMCIA slot on machines without one.
Point at a category and it opens; point at one of its rows and that row is
where the keyboard is. The cursor keys walk the same path -- up and down
within a list, right into a category, left back out -- and Return picks the
row under the cursor. Esc steps back one level, and closes the menu from
the top.
Picking a row that opens something else -- a window, a panel, a file dialog -- closes the menu behind it. Changing a setting leaves the menu up with the new value marked, so a run of changes costs one open rather than one each. Opening the menu also releases a captured mouse.
Menu Size under Video Settings draws the whole menu at 1x or 2x. The
start-up size is [display] menu_scale, --menu-scale, or Menu size on
the launcher’s A/V & Emu page (Display category).
The Debug workspace puts the Amiga display beside the debugger, Frame Analyzer, and Console in the main window. Switch inspectors with the tabs at the top, close one with the close box on its own tab, and resize the display using the divider. The title bar’s Play / Debug switch changes layout: Play restores the display layout and keeps the inspectors open, with their selections, captures, and command history. Switching layouts preserves the current run/pause state.
Click the display to send keyboard and mouse input to the Amiga; Cmd+G / Alt+G
returns input to the debugger. In the inspector controls, Esc leaves a text
field first, then returns to Play. When the Amiga owns input, Esc belongs to
the guest. Overlay panels remain modal: their keys and clicks stay in the UI.
Tools
Machine Configuration...: opens the configuration screen (below) to reconfigure the machine and relaunch it. The same screen opens automatically on a no-machine start.
Debugger... (also
Cmd+B/Alt+B): opens the Debug workspace, with the debugger, Frame Analyzer, and Console available from its selectors. The analyzer inspects captured chip-bus activity and registered resources; the Console provides the command line (Cmd+K/Alt+Kopens it directly).Freeze (HRTMon) (also
Cmd+Shift+B/Alt+Shift+B): presses the freezer cartridge’s button, so the machine runs on into the HRTMon monitor on its own screen; the monitor’sxcommand returns to the program. Greyed out unless a cartridge is fitted ([cartridge] model, or the configuration screen’s Freezer cartridge row); see Configuration.
Emulation Settings
Floppy Speed: the emulated drive speed -- turbo (disk DMA transfers complete almost instantly), 100% (real speed), 200%, 400%, or 800%. Changes apply to the live machine immediately. The row is greyed when no connected drive reads from an image -- no drives at all, or only physical drives, whose data rate is the disk’s own. The start-up value comes from
[floppy] speed; see Configuration for what each level preserves and the compatibility trade-off.Rewind (the hotkey is
Cmd+Z/Alt+Z): records rewind history. While it is on, the emulator keeps a ring of whole-machine snapshots and the hotkey steps the machine back through them -- the whole machine, not just the picture: CPU, chips, RAM and all. One press goes back one capture interval (half a second of emulated time by default). Turning it off releases the snapshots, which is where the memory goes; the budget and interval are[emulation] rewind_budget_mbandrewind_interval_frames, andrewind = truestarts recording at launch (see Configuration). It shares its substrate with the debugger’s reverse controls, so the same determinism caveats apply -- see Reverse debugging.Run Ahead: input-latency reduction for play -- Off, or 1 to 4 frames. Each display refresh commits one frame, runs a few silent future frames, presents the last future image, and rewinds to the committed boundary. Level 1 frame is the best starting point; higher levels need proportionally more host CPU (watch the performance overlay) and skip more intermediate animation. When a live device, writable medium, debugger, capture, or other host coupling makes speculation unsafe, selecting a level keeps it configured but the OSD says why it is inactive. The start-up value is
[emulation] run_ahead_framesor--run-ahead; the full compatibility list is in Configuration.
Audio Settings
Audio Output (also
Cmd+Shift+A/Alt+Shift+A): the system default, any host output device, or Disabled (sound off entirely, equivalent to--noaudio). The device switches live without a restart.Audio Filter (also
Cmd+A/Alt+A): Paula’s analogue low-pass filter -- Auto (guest-driven, the default), On, or Off. The forced settings apply regardless of what the software asks; Auto restores hardware behaviour. The PWR LED keeps following the guest’s /LED line whatever is forced here.
Video Settings
Menu Size: 1x or 2x, described above.
Framing: TV keeps the fixed monitor aperture (the default); Smart corrects small horizontal display offsets after the hardware envelope stays stable, with at most eight lo-res pixels of automatic adjustment; Full overscan shows the entire captured raster. Blank frames hold the previous Smart position. Manual centring adds a trim. Screenshots and frame dumps follow the selected framing.
Pixel Aspect: TV (4:3), the CRT pixel aspect (the default; PAL lo-res pixels slightly wider than tall, as a real TV shows them), or Square (a 320x256 screen is an exact 640x512, handy for pixel-exact comparison with square-pixel emulators). The window and its backing texture resize with the mode. The start-up mode comes from
[display] pixel_aspect(see Configuration).Scaling: how the display canvas is mapped to the window:
Smooth (default): fits the display canvas to the window while preserving the aspect ratio, using linear interpolation.
Integer: scales by whole-number multiples of the native canvas, centred with black borders and point-sampled. Under the default TV aspect the horizontal and vertical axes take independent integer multiples that approximate the 4:3 aspect ratio (e.g. 4:5 pixel aspect for NTSC on 1080p). In square pixel mode, scaling is uniform. Integer scaling also applies to RTG modes at multiples of native resolution, falling back to smooth scaling if the window is smaller than 1:1. Toggling integer scaling in TV mode resizes the window to the native canvas. The start-up mode is
[display] scaling(see Configuration).
Autocrop: crops the presentation to the active raster lines the Amiga hardware is programmed to display, so software with a smaller display window fills more of a wide screen. Combined with integer scaling, the integer multiplier is recalculated for the cropped area. The status bar and overlay panels stay docked at the bottom of the window; opening a menu or panel temporarily expands the display to the full area so the controls remain reachable. Autocrop affects the presentation only (captures always use the full aperture). It works with the CRT shaders and programmable multisync modes, and is suspended while a monitor bezel is drawn or an RTG mode is shown. The start-up value is
[display] autocrop(see Configuration). In Smart framing, autocrop selects from the unmasked raster before the TV aperture clips artwork. Integer scaling fits the complete detected display; PAL/NTSC pixel aspect stays tied to the scan.Screen Centring: nudge where the TV picture sits on the glass, the H-CENTER/V-CENTER controls a real monitor carried on its front. Picture Left/Right step one lo-res pixel (up to 16 each way), Picture Up/Down one scan line (up to 8), Reset recentres; the category row shows the current nudge. Stepping right brings the captured left overscan into view -- artwork that leans off the default view, like the CD32 boot logo’s leading serif -- while glass nudged past the captured raster shows black, as past the raster’s edge on a real tube. It is a TV-aperture control, so it is greyed under
overscan = "full", which already shows everything. Unlike the shader and tint it is picture geometry, not a window effect: screenshots and frame dumps follow it. Session-only; the start-up values are[display] tv_h_centre/tv_v_centre(see Configuration).CRT Shader: the GPU tube-emulation pass over the picture -- Disabled, Scanlines (the line structure of a 15 kHz set), Mask (an RGB phosphor shadow mask), CRT (1084) (both, plus a bowed tube face and a corner vignette), and Custom, greyed unless the config names a shader of your own, which is re-read from disk each time it is chosen. The change is session-only: the start-up preset, the strength knob, and how to write a custom shader are
[display] shaderandshader_strength(see Configuration). The pass is a window effect only -- screenshots, frame dumps and recordings are never shader-processed -- and it steps aside for the frames it cannot sensibly draw: while the menu or any panel is open, under RTG, and in programmable multisync scan modes.Shader Strength: how strongly the shader pass is applied, stepped 10% at a time with Stronger / Softer (the category row shows the figure); greyed while the shader is off. The start-up strength is
[display] shader_strength(see Configuration).Screen Tint: the monochrome-monitor tint over the picture -- Colour (full colour), Black & white, Green and Amber (the two classic monochrome phosphors), and Sepia -- the same looks as the web frontend’s Screen selector. Session-only, like the shader; the start-up tint is
[display] tint(see Configuration). A window effect only: captures stay untinted, the menu and the status bar keep their colours, and RTG scanout is never tinted.Fullscreen (also
Cmd+F/Alt+F): borderless fullscreen on the window’s current monitor. The picture keeps its aspect with black letterbox bars as needed, exactly as when resizing the window.Status Bar (also
Cmd+Shift+F/Alt+Shift+F): show or hide the status bar. Handy alongside fullscreen for a clean, chrome-free picture.Monitor Bezel: which monitor front the picture sits inside instead of filling the window -- Disabled, 1084 (a two-tone cabinet with the tube sunk into its moulding, and the model badge, the Copperline name and the power lamp along the bottom), or Classic (the plainer rounded frame Copperline drew first). The picture gets a little smaller to make room for either, and the tube shows a little more of it: the whole captured raster fills the glass edge to edge, border colour and all, so the opening’s rounded corners crop into the overscan border the way a real tube’s do, not into the picture.
Cmd+M/Alt+Mturns the chosen front off and back on; it never changes which. Session-only; the start-up value is[display] bezel(see Configuration). A window effect only, like the shader: screenshots, frame dumps and recordings never include it. A folder of PNG stickers can be drawn onto either front -- die-cut decals on the plastic, riding the same toggle -- via[display] bezel_stickers(no menu item; see Configuration).Performance (also
Cmd+P/Alt+P): show or hide the performance overlay. Session-only; the start-up value is[display] perf_overlay(see Configuration).VSync: synchronise presentation to the monitor’s vertical blank (on by default). Turning it off requests presentation without waiting for vblank where the graphics backend supports it; this may reduce latency but can tear. It takes effect immediately and leaves the emulation speed unchanged. The choice carries into Machine Configuration... when saving a config, as
[display] vsync.
Input Settings
Port 1 Device / Port 2 Device: hot-plug the controller in a game port -- Mouse, Gamepad Mouse (port 1 only), Joystick, CD32 Pad, Analogue, Light Pen, or None; see Controller ports.
Joystick Input (also
Cmd+J/Alt+J, or the status-bar icon): Gamepad-only or Keyboard joystick emulation.Autofire: the autofire rate (off, 3, 5, 8, 12, 16 Hz), which pulses a held fire button on live gamepad and keyboard input. Scripted input is never gated; see the
[input]section of Configuration.On-Screen Keyboard (also the status-bar keyboard icon): draws an Amiga keyboard under the display; see On-screen keyboard.
Paste as Keystrokes (also
Cmd+Shift+V/Alt+Shift+V): types the host clipboard’s text on the emulated keyboard, key by key, the way--type-afterdoes from the command line: US keymap, Shift held for upper case and shifted symbols, a newline as Return, a tab as Tab, one key every 100 ms of emulated time. Characters the Amiga keyboard has no key for are skipped (the on-screen confirmation says so). Typing starts a moment after the shortcut so its own Shift is up before the first typed Shift goes down. The typed keys go through the scheduled-input queue, so an input recording captures them as individual key events.Share Clipboard: host <-> guest clipboard text, both ways (text the guest copies lands on the host clipboard; host text is available to paste in the guest). Off unless the machine was started with
[clipboard] share = true/--clipboard, and greyed out otherwise: the guest side is part of the services board’s boot, and that board is not fitted unless it was asked for, because it moves the guest’s memory map. See the[clipboard]section of Configuration.Calibrate Gamepad...: the guided calibration flow, described below.
Input Mapping...: edits which host keys drive the controller controls, for both keyboard mappings; see Input mapping.
Warp Settings
Warp Speed (also
Cmd+W/Alt+W): runs the emulator unpaced for fast-forward. Toggling back re-anchors real-time pacing cleanly. A control-protocol client (warp.set), a GDB client (monitor warp), or the guest program (warpmode()through the uaelib trap, see Direct launching) can engage warp too. Each holds it independently and releases only its own; such a warp mutes live audio, the OSD names who asked, and one press of the shortcut ends them all.Warp Limit (also
Cmd+Shift+W/Alt+Shift+W): how fast warp runs. With VSync enabled, emulating one frame per presented frame would cap warp at the host monitor’s refresh rate (about 1.2x for 50 Hz PAL on a 60 Hz display). The limit sets an output frame skip -- 2x, 4x, 8x, 16x, or Max -- so warp retires that many emulated frames per presented frame, making the effective speed roughly the limit times the refresh rate (host CPU permitting).Maxruns flat out and still presents at vsync when enabled. With VSync off, presentation frequency depends on host throughput and compositor redraw scheduling. The default is set by[emulation] warp_speed(see Configuration).
Serial Port and Parallel Port
Shown only when something is on the port: the serial port in MIDI mode, or a sampler on the parallel port.
MIDI In / MIDI Out (serial port in MIDI mode): Paula’s serial bridge onto the host’s MIDI sources and destinations; see the
[serial]section of Configuration. Each list starts with None. MIDI Out also offers the built-in MT-32 and Coppersynth, and MIDI In offers the MT-32 while it is running, so an editor or librarian on the Amiga hears its replies.MT-32 (the MT-32 chosen as the MIDI output): Front Panel shows or hides its panel, Display (with the panel up) picks the panel’s display style, and Control ROM / PCM ROM name the loaded ROM images, each with a Load... row to fit another. See The MT-32.
Coppersynth (Coppersynth chosen as the MIDI output): Front Panel, SoundFont (Load... another, or Reset to the bundled one), and MT-32 Mode (Auto, On, or Off). See Coppersynth.
Sampler Input / Sampler Gain (parallel-port sampler attached): the sampler’s host capture device, and its input gain, which the Increase and Decrease rows step (also
Cmd/Alt+Shift +/-). Both change live. See the[parallel]section of Configuration.
PCMCIA Card
Offered only on an A600 or A1200, whose Gayle carries the credit-card
slot. The list opens with what is in the slot, which cannot be picked:
the card image’s file name, in the colour a value carries (cut short with
a ~ if it is wider than the list), or a greyed None.
Insert CF Card Image...: pick a hard-disk image (anything
[ide]accepts) and push it into the slot as a CompactFlash card, ejecting whatever was there. Gayle latches the card-detect change, so acard.resourceclient sees a real insertion.Eject Card: pull the card (greyed with an empty slot). An SRAM card’s backing file is written back on the way out.
See the [pcmcia] section of Configuration for
boot-time cards, SRAM cards, real card readers, and the fast-RAM rule.
Recording
Record Video (also
Cmd+R/Alt+R): starts a video-with-audio recording. While one runs the row reads Stop Video Recording, and it (or the shortcut again) stops it. See below.Record Input (also
Cmd+Shift+R/Alt+Shift+R): records every input event that reaches the emulated machine. The row then reads Stop Input Recording; stopping writes a script file that--scriptreplays deterministically. See below.Save Clip as GIF (also
Cmd+Shift+G/Alt+Shift+G): writes the last[recording] clip_seconds(ten by default) of the display as an animated GIF. See Saving a GIF clip.
Save State
Quick Save and Quick Load each list all ten numbered slots, naming when the slot was written or showing it as empty, so an overwrite is visible before it is chosen. No dialog, and no file to name. The hotkeys reach the same slots --
Cmd/Alt+<digit>saves andCmd/Alt+Shift+<digit>loads, with0as the tenth. See below.Save State... (also
Cmd+Shift+S/Alt+Shift+S): snapshot the whole emulated machine to a timestamped file in the states folder. See below.Load State... (also
Cmd+Shift+L/Alt+Shift+L): opens the Load State browser -- the states folder and the quick-save slots as a list of thumbnails, newest first -- to restore one and continue from exactly that point. Its Browse... button is the file dialog, for a state kept somewhere else.
Application controls
Load Kickstart ROM...: fit a different boot ROM. Pick a 512 KiB Kickstart or a 256 KiB Kickstart 1.x image, then optionally a second file for the extended ROM (512 KiB at F00000; Cancel to skip and remove any fitted extended ROM). The machine then cold-resets, as if the chip had been swapped and the power cycled. The OSD names the image it fitted -- the file name plus the Kickstart it was identified as, e.g.
ROM: kick40068.A1200 (Kickstart 3.1 (40.68) A1200).Keyboard Shortcuts...: the shortcut reference.
About...: the app version and a summary of the emulated machine -- its
ROM:line names the boot ROM file and, for a released image, which Kickstart it is (identified by checksum, see Configuration) -- and credits, including Copperline’s contributors and Patreon sponsors (seeCREDITS.md). Builds made from an untagged git commit append the short commit ID to the version shown in the About panel; the window title shows the plain release version. The desktop window title also shows the machine and boot ROM; its format can be changed with[display] titlein the configuration file. On macOS, About Copperline in the application menu opens this same panel.The panel’s Check for updates button asks GitHub which Copperline release is the latest and compares it with the running version. If a newer release is out, the line beside the button names it and the button becomes Open release page, which opens that release’s notes and downloads in your browser (or, if no browser will open, puts the page’s address on the clipboard). Pre-release ordering follows semantic versioning, so
1.0.0counts as newer than1.0.0-rc.1; a build from an untagged commit is compared by its version alone. Copperline never checks on its own: nothing is sent until the button is pressed, and the answer is forgotten when Copperline quits. The request is a plain HTTPSGETtoapi.github.comwhose only identifying detail is theCopperline/<version>user agent. GitHub limits how often one network address may ask, so a check repeated many times in an hour may be told to wait. Builds without theupdate-checkfeature have no button.Quit (also
Cmd+Q/Alt+Q): exits Copperline. It is the last row so that a controller or keyboard walking the menu finds it at the foot, with nothing below it to pick by mistake; there is no confirmation, as with the shortcut.
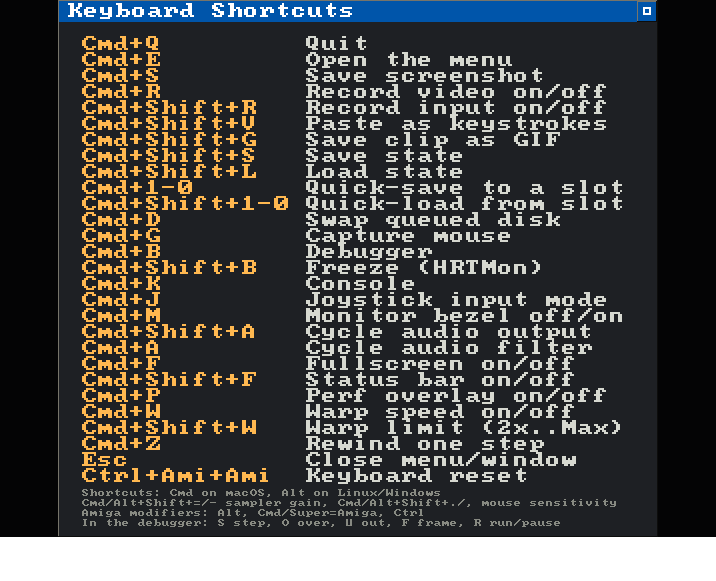
The Keyboard Shortcuts window.
Machine configuration screen
Starting Copperline with no machine specified -- no ./copperline.toml, no
--config, no ROM or override, and not a headless run -- opens the
configuration screen instead of booting. It is also available any time from the
menu’s Machine Configuration... item, seeded with the running machine’s
settings.
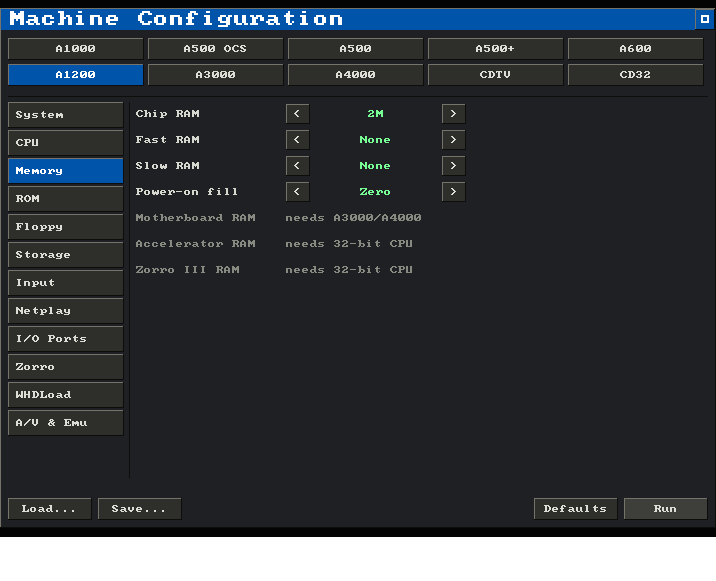
The configuration screen: the machine selector across the top, category tabs down the left, settings on the right, and the action bar along the bottom. Here an A1200 is selected on the Memory tab; Zorro III RAM is greyed with the reason “needs 32-bit CPU” (the A1200’s 68EC020 has a 24-bit bus).
The layout is:
Machine selector (top). Pick a machine -- A1000, A500 OCS, A500, A500+, A600, A1200, A3000, A4000, CDTV, or CD32. With no profile chosen the A500 is highlighted, since that is the machine the defaults describe. Selecting a machine applies that profile’s defaults (chipset, CPU, RAM, gate array, RTC) to every tab; settings that no longer apply (an IDE image on a machine with no IDE port, a CD image on a machine with no CD drive) are dropped so they cannot block a launch.
Category tabs (left sidebar):
System: chipset and Agnus/Denise overrides, video standard, real-time clock, identify board, RTG card, and freezer cartridge.
CPU: model, FPU, clock, caches, and the experimental JIT mode, which is not cycle-exact (see
[cpu] jitin Configuration).Memory: chip, fast and slow RAM; the cold power-on fill (zero, deterministic random, or a typed fixed 16-bit word); and motherboard, accelerator and Zorro III RAM.
ROM: Kickstart, extended ROM, and the CD32-only FMV module ROM. The Kickstart row carries Name, Version and Revision lines naming what the chosen image is, identified by checksum rather than by file name -- blank for an image Copperline does not know, and read from the image itself for the bundled AROS. The FMV row starts as an empty cartridge slot on the CD32: its Fit button fits the module with the bundled open ROM (saved as
fmv = true), choosing a file fits it with another 256 KiB module ROM, and Remove empties the slot again. It is greyed on other profiles; see Configuration.Floppy: the drive count, from zero to four (the CDTV and CD32 default to zero), and the drive speed, then each wired drive as a greyed DFn: heading with its indented disk image and write-protect box. Drives that are not enabled are hidden rather than greyed. A drive holding an image stays wired until that image is cleared, so reducing the count cannot hide media that will still be present when the machine starts. Each drive also carries a Physical drive tick box that hands the bay to a physical floppy drive: its media row then names the interface -- or
Nonewith nothing plugged in -- and a Configure button opens that drive’s own page. That page is headed with the built-in FluxBridge library and its version, and sets the serial port, drive select, density, read mode and replay speed, greying whatever the chosen interface does not honour. See Physical floppy drives (FluxBridge).Storage: IDE master and slave -- either can be a CD image instead of a hard disk, attaching an ATAPI CD-ROM drive there -- and the SCSI controller: A2091, A4091, or, on the A3000, its onboard SCSI. The controller’s boot ROM and unit rows appear once a controller is chosen and are hidden with none, the same way disabled floppy drives are; a unit can likewise be a CD image, attaching a SCSI CD-ROM drive. A block of buttons at the top links to eight sub-pages, each with a < Back button in that block that returns to Storage:
CD: image, insert delay, and CD32 NVRAM.
Host Folder: host directories served live as AmigaDOS volumes -- up to four mounts, each with a boot priority and a read-write/read-only Access field. The config file itself takes up to eight
[[filesys]]mounts, of which the screen edits the first four.Host Disk: a real disk of this computer’s (see Physical host disks).
Lide: the built-in
[lide]Zorro II IDE board -- personality (RIPPLE, RIDE or AT-Bus 2008), boot ROM(s), and up to four drives (two on RIDE and AT-Bus 2008), any of which can likewise be a CD image.Copperline HD: the emulator’s own virtual hardfile controller (
copperhf.device, configured as[copperhf]-- see Configuration reference), with up to seven units. There is no real hardware behind it, so the units are always shown, with no controller or personality to pick first. They take hard disks only: unlike IDE, SCSI, and Lide, a Copperline HD unit cannot be a CD image. A unit configured here attaches at boot like any other drive. Swapping its media while the machine runs is not a screen or menu action but a control-protocol call (copperhf.attach/copperhf.eject), which the window reports with an on-screen notice, as it does any other host-initiated media change.SF2000 SD: the SF2000 accelerator’s Zorro II SD card controller (
[sf2000sd]) -- one card slot and an optional boot ROM.Boot Priority: each drive’s synthesized-RDB boot priority (see below).
Create Image...: makes new ADF and HDF images (see below).
Input: the controller device in each game port, the joystick input source, the mouse sensitivity, when the host mouse is captured, and whether middle click releases it (see Controller ports).
Netplay: rollback netplay over the internet or a direct IP connection -- players, seat, invitation or addresses, input delay, rollback limit, and spectators (see Rollback netplay).
I/O Ports: the serial, parallel, networking, and audio boards, each on its own page -- Serial Port, Parallel Port, Networking, Audio -- switched between on the top nav row, with each port’s options indented beneath its heading:
Serial Port: the Device / Mode (None, Stdout, MIDI, TCP, TCP connect, PTY, Modem, or Host port) and what that mode needs. MIDI mode adds the MIDI input and output. With the emulated MT-32 as the output it also shows the MT-32’s ROM images, front panel and display style (see The MT-32); with Coppersynth, its SoundFont, front panel and MT-32 mode (see Coppersynth). The TCP and modem modes take a connection address -- Connect (
tcp-connect) for the remote target, or Listen (tcp,modem) for the local bind address -- in host and port fields. Leaving a field blank uses the default (host127.0.0.1for Listen, port1234; Connect requires a host/IP). Valid ports are 1-65535; on macOS and Linux, binding a Listen port below 1024 requires root privileges (outbound connections have no port restrictions). Modem mode adds a Telnet row, whether telnet translation (AT*T1) is on at power-on. Host port mode (device) shows a Port picker instead, stepping through the serial ports the host has at that moment (re-read on every step, so a freshly plugged adapter appears; a saved path the host does not list is kept and marked “not found”).Parallel Port: the device -- None, Printer, Sampler, or Multitap (4 joysticks) -- with, for the printer, its capture output file, or for the sampler, its host audio input and input gain.
Networking: the A2065 Ethernet and HostSocket bsdsocket.library boards, each None, Isolated, Loopback, NAT (in builds that support it), or Bridged (when the host has an adapter to bridge to). HostSocket also offers Host, which passes the guest’s sockets straight through to the host’s. Bridged adds a host-adapter row. NAT, Bridged and Host show a warning, because host-clocked traffic makes input recordings and save-state replays non-reproducible while it flows.
Audio: the Toccata and MHI sound boards, each a plain fit/don’t-fit toggle with no other options. Host-side audio capture (
--audio-wav,--audio-stems) stays command-line/config-file only and has no row here.
Zorro: extra autoconfig boards by metadata file, with a config panel for a WASM plugin board’s declared options.
WHDLoad: your game collection, and the settings games boot with (see WHDLoad support).
A/V & Emu: five pages switched on the top nav row, opening on Audio:
Audio: output device, channel mode, stereo separation, filter, floppy sounds and their volume.
Video -- the emulated picture: monitor bezel style, overscan, pixel aspect, scaling, autocrop, deinterlace, screen tint, phosphor, CRT shader and shader strength.
Display -- the host window: start fullscreen, host monitor and window position, status bar, perf overlay, VSync, and menu size. The position box accepts
X, Yoffsets from the chosen monitor; clear it for automatic placement.Emulation: power on at startup; run on startup (
[emulation] auto_launch, which runs an opened configuration at once); realtime priority; pacing budget; warp speed; warp boot and its storage-idle threshold; and the WHDLoad switch, which removes the WHDLoad tab and everything behind it when off.Paths: the
[paths]section of the configuration (see Configuration reference): the base folder on top, then one row per folder. The ROMs, Floppies, Hard drives and CD images rows set where file dialogs open rather than where output goes. A row reads(default)until a folder is chosen for it; Browse picks one and a Reset button then appears to put the row back to inheriting. The base folder always shows its full path, and swaps Browse for Reset once set. Changes take effect immediately -- a screenshot taken after moving the row lands where the row now says -- and are written to the configuration by Save As or Save default like everything else.
Settings rows (right pane).
[<]/[>]step through a value (an on/off setting steps between Enabled and Disabled), and the Browse and Clear buttons set or remove a file path through a native file dialog. For a hard-drive slot on the Storage tab or its sub-pages (IDE master/slave, a SCSI unit, a Lide drive, a Copperline HD unit, or the SF2000 SD card), Browse on macOS lets you pick a directory as well as a file, since any of those slots can be a host directory mounted as an in-memory FFS volume instead of a raw image. On other platforms the dialog is file-only there too, matching the rest of the screen, and a directory target has to be set some other way (e.g. by editing the config file). Once such a slot has an image, a small editable box appears next to Browse: click it and type to set the volume name for a directory mount (left blank, a directory mount inherits the host directory’s name; the box has no effect on a raw HDF). Once that image is a host directory specifically, an FFS/OFS button appears just left of the volume-name box: click it to flip the in-memory volume’s filesystem (FFS by default; OFS is the one every Kickstart from 1.2 onward can read with no guest-side setup). A setting that does not apply to the chosen machine is greyed and shows why in place of its control -- “needs 32-bit CPU” for Zorro III and accelerator RAM, “needs 68020+” for the FPU. On a 24-bit CPU the RTG card list simply leaves out the Zorro III cards. What a greyed row names is that row’s own enable condition; where the same thing can be had another way, a clause after a semicolon says where rather than naming it as a second condition the row would turn on for. So the IDE bays read “needs A600/A1200/A4000; Lide has its own” -- they are the motherboard channel alone, and a Lide board carries drives of its own on the Lide sub-page -- and the CD rows read “needs CDTV/CD32; on a bus, use a drive slot”,[cd] imagefeeding the built-in CDTV/CD32 drive alone while a CD-ROM on SCSI/IDE/Lide is a drive slot holding a CD image.Boot Priority sub-page (from Storage). One row per hard-disk drive, under Drive / Priority / Status columns, setting the
de_BootPriwritten into the partition Copperline synthesizes in front of a bare hardfile (it has no effect on an image carrying its own RDB). In the Priority column[<]/[>]nudge the value by one and the value box is also a text field -- click it and type any priority (-128..127), then Enter. The Status column’s Bootable box is ticked by default; clearing it greys that row’s priority and writes the -128 “disabled” sentinel, so the volume mounts but never boots. Priority arrows step each attached drive, including all seven Copperline HD units; they leave the remembered priority unchanged while Bootable is cleared. A drive with no media, a CD image, or a real host disk (whose partitions carry their own priorities) is greyed with the reason (“No drive”, “CD-ROM”, “Host Disk”). SCSI, Lide, SF2000 SD and Copperline HD units appear only when media is attached, so the list shows only real boot sources. Drives are listed in order: IDE bays, SCSI units, Lide drives, the SF2000 SD card, and Copperline HD units. A page holds nine drives; if the list is longer, Next Page > walks forward through as many pages as the drives need, and every page’s < Back returns to the first. Newly added drives are assigned cascading default priorities (0 for the first hard drive, followed by -35, -40, -45) to avoid boot conflicts. A drive already carrying a priority in the config keeps it, and one that just names a device with nobootpristays at 0. See Configuration reference for how the priority ranks against Kickstart’s DF0: boot node at 5.Action bar (bottom). Load... reads a
.tomlconfig through a file dialog. Save... opens a small dialog of three buttons, each described in the dialog as the pointer moves over it: Save As writes a.tomlthrough a file dialog (a minimal file, only the settings that differ from the chosen profile’s defaults, so it reads like the example configs); Save default saves the running configuration as the one Copperline starts with: this screen opens showing it, and a run with no--configand no./copperline.tomlboots it (see Configuration reference);--factoryignores it for one run. Reset default deletes that saved default after an “Are you sure?”, returning Copperline to factory settings. The close gadget, or a click anywhere else, puts the dialog away. Defaults resets the screen to the selected profile. Run validates the configuration and boots it; if anything is wrong -- an unusable RAM size, a missing disk image, a ROM file that cannot be read, an option the chosen machine cannot use -- the reason is shown on the status line and you stay on the screen to fix it.
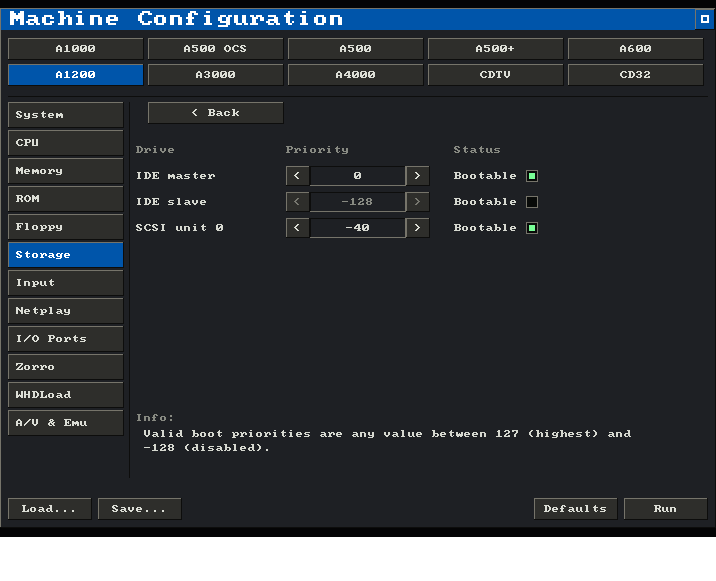
The Boot Priority sub-page: an A1200 whose IDE master boots at priority 0, its slave with the Bootable box cleared (showing the -128 that stores), and one SCSI unit of a fitted A2091 carrying a disk of its own. A greyed Info: label heads a note on the valid priority range.
Saved files use the same schema as a hand-written copperline.toml
(see Configuration reference), so the screen and the config file are
interchangeable: configure a machine and save it, or load an existing config to
tweak it. Run builds the machine in place, so the configuration screen and a
direct --config launch produce an identical machine.
Create Image
Storage -> Create Image... makes new, empty disk images: Floppy Disk writes an ADF, Hard Disk writes an HDF. These pages write a file and nothing else; none of their settings belongs to the machine, so none of it is saved to a configuration file.
Save... opens a file dialog, then writes the image. The status line reports progress and the finished size; the write runs in the background, so the window stays responsive while a large image is written.
A hard disk image is saved as .hdf or .img, which hold the same bytes.
The page does not write CHD, and refuses a name ending in .chd; make a
CHD from the finished image with chdman createhd.
Floppy Disk
| Option | Effect |
|---|---|
| Density | DD (880K) or HD (1.76M). Sets the image size: 901,120 or 1,802,240 bytes. Copperline’s floppy drives are double-density only and cannot use an HD image in either container, so the page shows a warning while HD is selected. Make HD images for another emulator, or for a real Amiga with a high-density drive. |
| Container | Standard ADF writes the sectors in order. Extended ADF wraps them in the UAE-1ADF container, which stores one record per track. |
| Filesystem | Unformatted leaves the image blank for the Amiga to format. OFS and FFS write a boot block, root block and bitmap. |
| DOSType | The DOS type’s options: International case folding, Dir cache, Long names. See DOSType below. |
| Volume name | The name the volume mounts under. |
| Bootable | Writes the boot code that loads dos.library, so the disk boots rather than only mounting. |
Hard Disk
| Option | Effect |
|---|---|
| Size | A whole number up to 9999, in the unit beside it. Click MB/GB to change the unit. The image is rounded up to the next whole cylinder. |
| Geometry | Auto derives cylinders/surfaces/sectors from the size. Custom sets them by hand, and adds a Configure button that opens the geometry editor. |
| Partitioning | RDB writes a Rigid Disk Block and one partition filling the drive. None writes no partition table. |
| Filesystem | As for a floppy. With RDB the type is recorded in the partition entry; with None the volume starts at block 0. |
| DOSType | As for a floppy. |
| Device name | The device the partition mounts as, e.g. DH0. RDB only. |
| Volume name | The name the volume mounts under. |
| Bootable | Sets the partition’s bootable flag. RDB only. |
| Boot priority | The partition’s de_BootPri, -128 to 127. Kickstart enters DF0: at 5, so 6 boots the hard disk ahead of a floppy. Applies while Bootable is ticked. |
| Read only | Marks the finished file read-only on this computer. |
| Sparse image | On by default: the file is created at full length with only its structure written, and the host fills the rest in as it is used. Clear it to write the whole file now, which takes as long as writing that many bytes. |
An image larger than 2048 GB can be made only with Partitioning: None
and Filesystem: Unformatted: every block number an RDB or an AmigaDOS
volume uses is a 32-bit field.
With Sparse image cleared, the volume the file is being written to is checked for room first, and the write is refused if there is not enough.
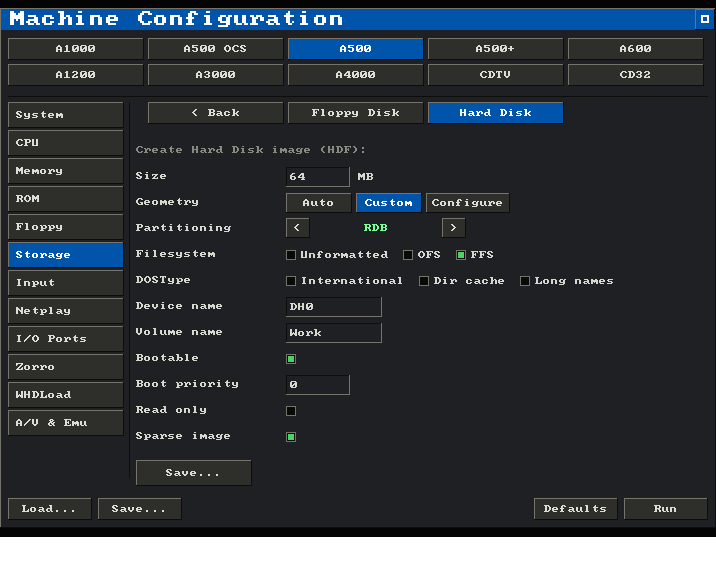
The Hard Disk page, set up for a 64 MB bootable FFS volume in an RDB with custom geometry.
Geometry editor
Reached from Configure on the Hard Disk page once Geometry is set
to Custom. The geometry set here decides the image’s size; the Size box
seeds it.
| Option | Effect |
|---|---|
| Cylinders, Surfaces, Sectors per track | The drive’s stated geometry. Surfaces x sectors is one cylinder; the RDB states the partition in cylinders, so these set the granularity a partition can start and end on. |
| Reserved blocks | Blocks at the front of the partition the filesystem never allocates. Two -- the length of the boot block -- unless there is a reason to say otherwise. |
| Drive, Type, Revision | What the drive answers when asked what it is. HDToolBox shows the first two as its Drive and Type columns. Each box holds as many characters as its RDB field: 8, 16 and 4. |
Apply returns to the Hard Disk page. Auto puts every figure back to
what the size implies, and the identity back to Amiga / the size /
Copperline’s version.
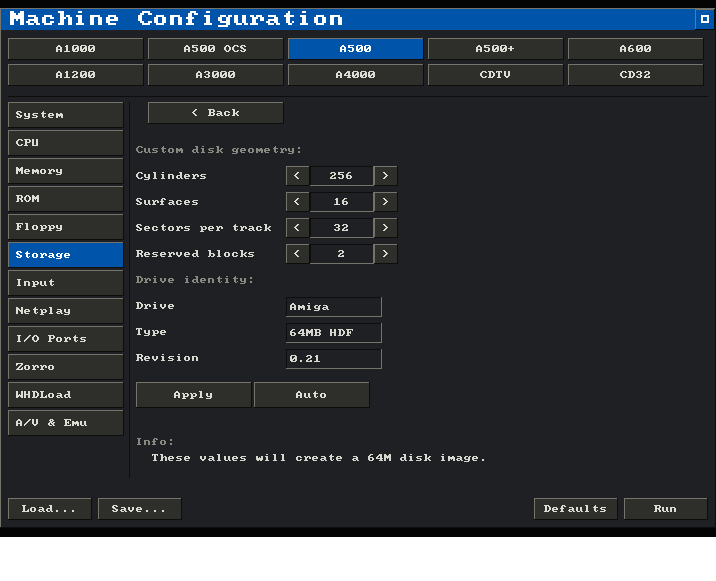
The geometry editor, with the drive identity below the figures and a note of the size they come to.
DOSType
The Filesystem row picks OFS or FFS; the DOSType row picks the options that filesystem carries. Between them they name one of the eight AmigaDOS types:
| Ticked | Type |
|---|---|
| -- | DOS0 (OFS), DOS1 (FFS) |
| International | DOS2, DOS3 |
| International + Dir cache | DOS4, DOS5 |
| International + Long names | DOS6, DOS7 |
Dir cache and Long names are two values of one field, so ticking one
greys the other. Both are international, so International shows ticked
and greyed alongside either.
Dir cache needs Kickstart 3.0, International needs 2.0, and Long names needs a filesystem no Kickstart provides.
Saving native screenshots
Choose Recording → Save Native Screenshot (1:1) to save the active playfield at its original pixel size, without the TV border, aspect correction, filtering, phosphor persistence or tint. Black pixels inside the playfield are kept. RTG screens save at the board’s native resolution. Interlaced chipset screens save the current field, without blending or weaving another field into it.
Starting Copperline with --native-screenshots also makes the camera button
and Cmd+S / Alt+S use this capture. You can switch just the button and
shortcut in Video Settings → Native Screenshot Button; set
[recording] native_screenshot_button = true to start with it enabled.
To keep a change made in the menu, choose Machine Configuration → Save default.
See native headless captures
for resolution and crop details.
Screenshots save to the screenshots folder.
Recording video
Cmd+R on macOS or Alt+R on Linux/Windows (or the menu’s “Record Video”)
starts capturing the emulated display and sound to
copperline-video-<YYYYMMDDHHmmSS>.avi in the
recordings folder; pressing it again stops and
finalizes the file. A red REC badge sits in the display’s top-right corner
while a recording runs. Like the screenshot overlay, the badge, status
bar, and menus are never part of the captured video.
The file is an AVI with lossless ZMBV video (the DOSBox capture codec:
zlib-compressed keyframes plus frame deltas, which keeps typical Amiga
output to a few MB per minute) and uncompressed 16-bit stereo PCM audio
at 44.1 kHz. It plays directly in VLC, mpv, and anything else built on
ffmpeg; for other players, transcode with
ffmpeg -i copperline-video-<ts>.avi out.mp4.
Frames and audio are captured on the emulated timeline, not the host clock: the recording stays in sync even when the host stutters, and a capture made under Warp Speed plays back at normal speed. The audio track is tapped before the status bar’s volume slider, so recordings keep full level regardless of the live output volume. Pausing (or powering off) suspends the capture; recording resumes when emulation continues.
Saving a GIF clip
The window keeps a rolling ring of the last ten emulated seconds (by
default) of the picture it presents, so a moment worth sharing can be
saved after it happened: Cmd+Shift+G on macOS or Alt+Shift+G on
Linux/Windows (or the menu’s “Save Clip as GIF”) writes the ring as
copperline-clip-<YYYYMMDDHHmmSS>.gif in the
recordings folder and confirms the file name on screen
when it is done. The clip is written on a background thread, so emulation
never pauses; asking for another clip while one is still being written
only shows a notice.
The GIF shows exactly what a screenshot would: the presentation’s crop,
TV aperture, H/V centre and pixel aspect, with the status bar, menus and
the on-screen message left out. Frames are thinned to 25 per second on
PAL and 30 on NTSC ([recording] clip_fps sets another rate) and each
carries its own palette, so the usual Amiga picture is stored losslessly;
a frame with more than 256 colours (a HAM picture, for example) is
reduced to 256 with NeuQuant when the file is written. Frame delays
follow the emulated timeline, so a clip made under Warp Speed plays at
normal speed, and a stretch where Warp presented no frames plays as one
held frame rather than a burst. A clip has no sound; use
Record Video for that.
[recording] clip_seconds sets the ring’s length (up to 120 seconds; 0
switches the ring off, and the menu item and shortcut then only say so)
-- see Configuration. The ring holds
pictures in their palette-indexed form and stores a picture once however
long it stays on screen, so a ten-second ring costs well under 100 MB of
host memory in practice; it is bounded at 256 MB regardless. Loading a save
state, resetting or running a different machine starts the ring over.
The headless --gif-after flag writes the same kind of clip from a
scheduled emulated time (see Capturing GIF clips).
Recording input
Cmd+Shift+R on macOS or Alt+Shift+R on Linux/Windows (or the menu’s
“Record Input”) starts logging every input event that reaches the emulated
machine -- key presses with their hold times (typed on the host keyboard
or clicked on the on-screen one, which reaches the
machine by the same path), mouse buttons and motion, joystick / CD32-pad
controls, analogue pot positions, and floppy inserts, on whichever port
carries each device -- each stamped with its emulated time. Pressing it
again stops the recording and writes
copperline-input-<YYYYMMDDHHmmSS>.clscript in the
recordings folder: a plain text file of scripted-input
directives that copperline --script FILE replays exactly, because the
core is deterministic and the events re-fire at the same emulated
timestamps.
This is the direct way to turn “I can reproduce it by hand” into a
regression: play the sequence once while recording, then keep the script
(optionally together with a save state to skip the
lead-in) as a deterministic, shareable reproduction. The format and the
headless --record-input variant are described in
Input scripts and recording.
Save states
Cmd+Shift+S on macOS or Alt+Shift+S on Linux/Windows (or the menu’s
“Save State”) writes a snapshot of the whole emulated machine to
copperline-state-<YYYYMMDDHHmmSS>.clstate in the states folder: CPU,
chip/slow/fast RAM, ROM, the full chipset and CIA state, floppy images
(including unsaved in-memory changes), expansion boards, and CD/NVRAM
state. Cmd+Shift+L / Alt+Shift+L (or “Load State...”) opens the
browser below to restore one; the machine continues
from exactly the saved point, byte-for-byte -- the core is deterministic,
so a resumed run is indistinguishable from one that was never interrupted.
Your audio output settings (the volume slider, mono/stereo, stereo
separation, and the filter override) are not part of the machine: loading
a state or rewinding keeps whatever they are set to now.
Every state also carries a small card about itself, written ahead of the
machine so it can be read without loading anything: a thumbnail of the
display at the moment of the save (240 pixels wide, the same picture a
screenshot would take), the emulated time and the wall-clock time of the
save, a one-line machine summary, and the names of the media in the
drives (floppies, hard-drive images, CD). The browser shows it, and
copperline-ctl state-info FILE.clstate prints it as JSON (with
--thumbnail FILE.png to write the picture out; see the
control protocol reference).
States written before this card existed load exactly as before and show
in the browser without a picture.
States are taken at emulated-frame boundaries and are versioned per subsystem: the file is a set of tagged chunks (CPU, memory, Paula, Agnus, floppy, expansion boards, ...) that name their fields, so a state keeps loading across releases that add or drop state fields, and a release that changes what a subsystem’s state means upgrades that chunk on load. A file a build cannot read is refused with a message naming the chunk and versions rather than producing a corrupt machine. A build still needs support for every expansion board present in the snapshot. States written by Copperline 0.19 and earlier used a flat layout with a single version and must be recreated.
Saving over an existing file replaces it only after the new snapshot has been completely written and flushed. A failed save leaves the previous file intact.
A state is self-contained: it carries its own RAM, ROM, and chipset, so loading one always restores the machine it was taken on -- even if you launched Copperline with a different config. When the loaded machine differs from the running one -- a different model, chipset, video standard, RAM size, or even a different Kickstart of the same machine (the ROM is fingerprinted) -- the load reconfigures to match the state and tells you so (the load message names the restored machine, e.g. “reconfigured to A1200 / 68EC020 / AGA / PAL”); your current config is not silently mixed in. Two caveats:
Hard-drive images (HDF files) are referenced by path, not embedded. The state reopens the same file on load, so guest writes made to the hard drive after the snapshot are still visible after restoring -- treat a state as a CPU/chipset snapshot, not a disk backup. In-memory volumes (directory-as-HDD) and floppy images are embedded whole.
CD images are likewise reopened by path; keep the cue sheet and its files (or the CHD) where they were.
Load State browser
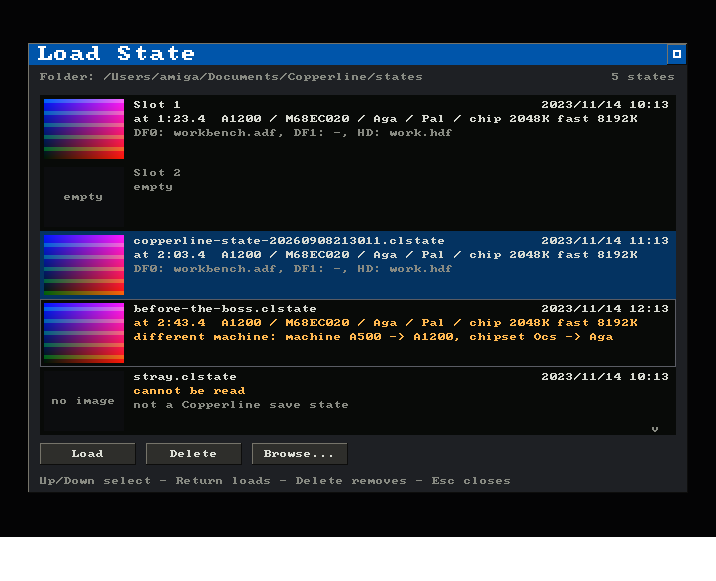
The Load State browser: the ten slots, then the folder’s states newest first. One state was taken on a different machine and is flagged; one file is not a state at all and says so.
Load State... (or Cmd+Shift+L / Alt+Shift+L) lists the
states folder: the ten quick-save slots
first, empty ones included, then every other .clstate in the folder,
newest first. Each row shows the state’s thumbnail, when it was saved,
how far into the emulated run it was taken, the machine it was taken on,
and what was in the drives. A state taken on a different machine than
the one running -- another model, chipset, memory size, or Kickstart --
is shown in amber with the difference named; it still loads (a state
carries its own machine, and the load reconfigures to match it, as
described above), the flag just says that it will. A file the build
cannot read is listed with the reason, so a stray or damaged file can
still be found and deleted from here.
Clicking a row loads it and closes the browser. With the keyboard, up and down move the selection (Page Up/Down and Home/End move faster), Return loads the selected state, and Delete asks before removing its file -- the question comes up with Cancel under the focus, so a second Return keeps the file and Delete again (or left, then Return) removes it. Down off the foot of the list reaches the button row, where left and right pick Load, Delete, or Browse...; Esc closes the browser (or withdraws the question first). A controller walks the same list with its d-pad, fire, and second button, as everywhere else. Browse... opens the file dialog for a state kept outside the folder.
A deleted slot shows as empty again; a deleted named state leaves the list. Loading reports “Loaded Slot 3” or the file’s name on the OSD, and a state that fails to load puts the browser back up with the reason on its status line.
Quick-save slots
Naming a file is the wrong interaction for the “before this jump” save you
take twenty times an hour, so there are ten numbered slots as well.
Cmd/Alt+<digit> saves to that slot and Cmd/Alt+Shift+<digit> loads it,
with 0 as the tenth. The menu’s Quick Save and Quick Load lists
reach the same ten, each row naming when that slot was written or showing it
as empty.
A quick save overwrites its slot without asking -- that is the point of it --
and loading a slot that has never been written reports “Slot N is empty”
rather than failing. Slots are ordinary .clstate files, identical in format
to a named save, kept in the states folder below, and the
Load State browser lists them first, each with its
thumbnail, so a slot can be told from another by what it shows rather
than by its number. And because they are per user and not per machine, a
slot may hold a state from a different Amiga than the one running. That is
safe: as above, the state carries its own machine and the load
reconfigures to match it and says so, and the browser flags such a slot
before it is picked.
The headless flags --save-state-after SECS PATH and --load-state PATH
script the same feature for debugging workflows: snapshot a
long-running program just before the scene under investigation once, then
iterate from the state in seconds instead of re-emulating minutes. The
file format and what exactly is (and is not) captured are specified in
the internals chapter.
Where files go
Everything Copperline produces is kept per user rather than per working directory, so it is reachable however Copperline was launched. The host-data directory is:
| Host | Location |
|---|---|
| Linux/BSD | ~/Documents/Copperline/ |
| macOS | ~/Documents/Copperline/ |
| Windows | %USERPROFILE%\Documents\Copperline\ |
with a folder inside it for each kind of file: screenshots/, states/
(named saves and the quick-save slots), recordings/ (video captures, GIF
clips and recorded input scripts), nvram/ (battery-backed clock RAM and CD32 game
saves), traces/ (debugger traces and waveform captures), and configs/
(configurations saved from the configuration screen). Each folder is created
on first use, and each can be moved with the [paths] section of the
configuration or the configuration screen’s A/V & Emu -> Paths page --
see Configuration reference. Headless flags that take an explicit path
(--screenshot-after and friends) write exactly where they are told and
ignore all of this.
A battmem.nvram or cd32-nvram.bin left in the working directory by an
earlier Copperline keeps being used from there -- they hold real game saves,
so nothing is moved or abandoned behind your back.
For a self-contained installation, create an empty file named portable.txt
beside the Copperline executable (or beside the downloaded .AppImage) and
restart Copperline. That folder then becomes the host-data directory, and all
of the folders above -- plus gamepad calibration, keyboard mappings, the
default WHDLoad library and other per-user host data -- live inside it, so
the whole installation moves as one folder. Delete portable.txt to return
to the platform location above; Copperline does not move existing files in
either direction.
Controller ports
An Amiga has two game ports, and either accepts any controller. Copperline
models that: each port carries a device -- mouse, joystick, cd32 pad,
analogue paddles, lightpen, or none, and port 1 additionally
gamepad-mouse -- set with [input] port1/port2 in the
config (or --port1/--port2, or the launcher’s Input tab). The default
is the stock wiring, a mouse in port 1 and a joystick in port 2 (a CD32 pad
on the CD32 profile). The runtime menu’s Port 1 Device / Port 2
Device items hot-plug a different device live, exactly like swapping the
physical plug: the old device’s lines release, and the port’s quadrature
counters hold.
The host mouse drives the (lowest-numbered) port with a mouse plugged in
and feeds its JOYxDAT counters. Click the display (or press Cmd+G on
macOS or Alt+G on Linux/Windows) to capture the host mouse; the same
shortcut releases it. The click that takes the capture is a window
action and is not passed to the Amiga, so the first click that reaches
the guest is the first one aimed at it -- otherwise a single click on a
gadget arrives as two, close enough together to read as a double click.
While an overlay panel is open, host cursor motion is not fed to the
emulated mouse. In the Debug workspace the
inspectors own the keyboard and mouse until you click the display: that
click hands input to the Amiga (capturing the mouse when a port has
one), and Cmd/Alt+G or a click outside the display hands it back.
Entering the Debug workspace while the mouse is captured borrows the
cursor, and returning to Play hands the capture back, so a visit to the
debugger does not leave the machine uncaptured -- which matters most in
fullscreen, where there is no desktop to reach for. An explicit
Cmd/Alt+G release settles it the other way: the capture stays off.
Uncaptured, host cursor motion over the display still drives the
emulated mouse, and [input] mouse_sensitivity scales it the same way
it scales captured motion. At the default setting the factor is 1.0 and
the pointer tracks the host cursor one-for-one.
[input] mouse_capture (--mouse-capture, the launcher’s Input tab)
changes when the grab is taken: auto grabs whenever the window has the
focus and on entering fullscreen, so no host cursor is ever loose over
the display, and manual grabs only on the shortcut, leaving display
clicks to go straight to the Amiga. See
Mouse capture.
Enable Middle to release on the launcher’s Input tab, or set
[input] middle_click_release = true, to release capture with the middle
mouse button. It defaults to off, so middle click reaches the guest.
When enabled, the click that releases capture is consumed.
A USB gamepad drives the emulated digital joystick on whichever port one is
plugged into: directions through JOYxDAT, fire through /FIRx, and a second
button through POTxY/POTGOR. A cd32 device speaks the CD32 serial button
protocol instead, including the red/blue/green/yellow and transport
buttons, on either port. An analogue device presents pot resistances on
the POTxX/POTxY pins; no live host device maps to it yet -- drive it with
--pot-after scripting or the control protocol’s input.analogue.
A lightpen device (alias lightgun) follows the host pointer over the
display: wherever the pointer is, the pen’s photodetector is held against
that pixel, and Agnus latches the beam position as it sweeps past (readable
through VPOSR/VHPOSR while the guest sets BPLCON0 LPEN). A left
click over the display presses the pen’s tip switch -- a light gun’s
trigger -- which the pen puts on the port’s third-button line (POTxX),
since pin 6 is the pulse line itself. Leave the mouse uncaptured: a
captured pointer has no position to follow. The pen only reaches Agnus from
the port the board wires to its LP input, port 1 on the A1000 and port 2
on every later Amiga; a pen in the other port is logged at start-up. See
Port devices for the headless and
control-protocol forms.
Ports 3 and 4 are the sockets of the parallel-port multitap, also
called the four-player joystick adapter. Set I/O Ports -> Parallel Port ->
Device to Multitap (4 joysticks) in the launcher, or use
--parallel multitap (the joystick-adapter name also works). Games
such as Super Skidmarks, Kick Off 2 and Dyna Blaster read these sockets
as two extra joysticks.
For four local USB/Bluetooth controllers, select Joystick for both native ports and use gamepad input mode:
copperline --parallel multitap --port1 joystick --port2 joystick --joystick gamepadControllers fill the configured joystick ports in port order. Each has its own state and calibration; unplugging one releases its controls without moving the other controllers between players. The next controller connected fills the vacant slot. The first controller also operates Copperline’s menu. To calibrate another controller, connect it alone while running calibration.
The cursor-key and numeric-keypad mappings fill remaining player slots. Two physical controllers plus the two keyboard mappings can therefore drive all four players. Keyboard input mode reserves the first joystick port for cursor keys, with up to three physical controllers filling the rest. With no pads, cursor keys and numpad retain their usual two-player assignment. Bindings remain editable through Input Mapping....
Scripted --joy-after ... 3/4 and the control protocol’s input.joy address
the adapter sockets directly. The libretro core also exposes
both sockets, and Netplay can give each socket to a player on
another computer.
A gamepad-mouse device is a mouse a gamepad moves as well as the host’s
own; the machine still sees one mouse. The d-pad moves the pointer,
gathering speed while a direction is held, and the left stick moves it
proportionally where the pad has one. Fire is the left button, the second
button the right, and mouse_sensitivity scales both hands alike. It is
offered on port 1 only. While it is chosen the pad drives no joystick
port -- whichever port it would have driven falls to the keyboard until
the device is changed back.
Copperline can also emulate the joystick from the host keyboard. There are two explicit input modes, and the active one is always shown by the gamepad / keyboard icon in the status bar (next to the volume control), so a “my keys aren’t working” surprise can be spotted and fixed at a glance:
gamepad (the default): use only a recognised or calibrated gamepad; every keyboard key passes through to the Amiga. With no pad connected there is no joystick input. This is the no-surprise mode for interactive AmigaOS setup.
keyboard: use the keyboard-joystick mapping so the joystick port works without a controller.
With joysticks (or pads) in both ports, two connected gamepads drive one each in gamepad mode. With one gamepad, cursor keys drive the other port; with none, the numeric keypad substitutes for the gamepad so two players can share one keyboard. Keyboard mode keeps cursor keys on the first joystick port even when multiple gamepads are connected.
With mice in both ports, the host mouse drives the lower-numbered one and
the cursor-key mapping drives the second as an emulated mouse (in
keyboard mode; in gamepad mode the second mouse is undriven and the
keyboard passes through). The same applies whenever the keyboard-routed
port carries a mouse: the mapping’s keys become the pointer.
Click the status-bar icon to flip between them; the menu’s Joystick Input
item and Cmd+J on macOS / Alt+J on Linux and Windows do the same. Set the
starting mode with [input] joystick in the config (or --joystick MODE, or
the launcher’s Input tab).
The primary keyboard mapping is FS-UAE-compatible: cursor keys for
directions, and Right Ctrl, Right Alt or Left Ctrl for fire, with Left
Alt as the second button (the left-hand fire keys pair naturally with the
right-hand arrows, and compact keyboards often lack the right-side
modifiers). For CD32 pad buttons, C is red/fire, X is blue, D is
green, S is yellow, Return is play/pause, Z is rewind, and A is
forward. On a mouse port the same keys drive the pointer: cursor keys
move it, the fire keys are the left button, X or Left Alt the right,
and D the middle. The second (numpad) mapping is
8/2/4/6 for directions, 0 for fire, . for the second button,
and numpad Enter for play. While a mapping owns its keys, they are not
sent to the Amiga keyboard.
Those are the defaults; every binding is editable from the menu’s Input
Mapping... item (see Input mapping). A held fire button can also be
turned into a pulse train with the Autofire item or [input] autofire_hz.
Gamepad calibration
Most pads work with no setup at all: a controller found in the bundled
SDL_GameControllerDB (or identified by the platform driver) uses a fixed
standard layout. The d-pad and left stick drive the directions; the south
face button (A / Cross) is fire / CD32 red, east (B / Circle) is blue,
west (X / Square) is green, north (Y / Triangle) is yellow, Start is
play/pause, and the left and right shoulders or triggers are reverse and
forward. Select/Back and the guide button -- which no emulated control
uses -- open the pop-up menu, and Select held quits (both below).
Personal SDL mapping strings in the standard SDL_GAMECONTROLLERCONFIG
environment variable are honoured too.
Calibration is the per-pad override, and the only path for controllers the database does not cover: push each control when prompted. This records raw axis/button codes and directions, which makes any pad work regardless of database coverage -- including pads with broken database entries -- and handles inverted or odd axis layouts automatically. A saved calibration always wins over the database for its pad.
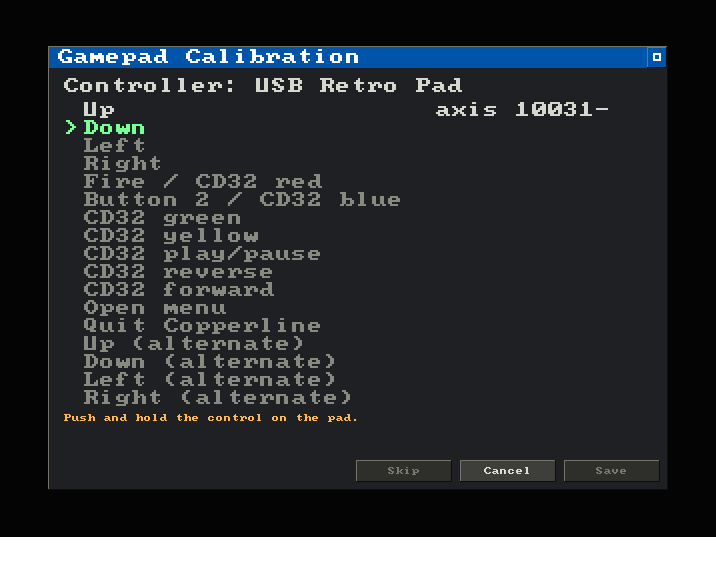
The calibration window mid-flow. Skip covers pads without the CD32 extras.
Run it either from the menu (“Calibrate Gamepad...”) -- which ends with a
live test of the finished bindings and a Save button that makes them live
immediately -- or from the terminal with copperline --calibrate-gamepad.
The steps are the four directions, fire (CD32 red), button 2 (CD32 blue),
the CD32 green/yellow/play/reverse/forward buttons, an Open menu
button, a Quit Copperline hotkey, and finally the four directions
again as alternates. Push a control to bind it. To skip a step the pad
has no control for, press Skip or hold any control for 0.7 seconds
(in the terminal flow, wait five seconds); every step after fire can be
skipped, but the four directions and fire cannot.
The alternates are for a pad with both a stick and a d-pad: bind the
stick to the first four steps and the d-pad to the alternates (or the
other way round) and either steers, as on the standard layout. Each
alternate simply ORs with its primary, so a pad with one set of
directions skips them and loses nothing. When a direction pair is bound
to the two ends of one stick axis, the stick’s deflection is known too,
and a gamepad-mouse device on that pad moves the
pointer at a speed that follows the stick rather than at the d-pad’s
fixed pace.
The Quit hotkey is a host-side control: it never reaches the emulated machine, so any spare pad button (Select, Start, a shoulder button) can carry it without affecting the game. To guard against accidental presses it must be held for about a second and a half -- an on-screen countdown shows the hold in progress, and releasing early cancels it. It works whenever the pad is connected -- even while the keyboard or another device drives the joystick ports, and while the machine is paused or powered off. On the default database layout Select/Back carries it: a tap opens the menu and keeping it held quits, with the countdown drawn over the menu; let go early and the menu simply stays open, where Quit is the last row. A calibrated pad’s Menu button works the same way unless a separate Quit control was bound, which then takes the hold to itself. Skip both steps to leave quitting to the menu row and the keyboard shortcut.
The Menu button is the other host-side control: a press opens the pop-up menu, or closes whatever is up instead -- the menu, an overlay panel, or the Debug workspace’s front inspector. From the menu the pad walks whatever is up, as described under Keyboard and controller navigation above. While the menu or a panel is open the pad stops driving the emulated port, just as the keyboard does. On the default database layout Select/Back and the guide button carry it; a calibration can put it anywhere (or skip it). Held, it doubles as the Quit hotkey, as above.
Once every step is captured, pushing a control tests its binding and holding one hands the panel’s Save and Cancel buttons to the pad, so a calibration can be finished without the mouse.
Calibrations are saved per controller UUID in
~/Documents/Copperline/gamepads.toml
(%USERPROFILE%\Documents\Copperline\ on Windows, or beside the
executable in portable mode). A calibration recorded by
a Copperline version that predates the bundled controller database can
resolve a stick direction reversed on a database-covered pad; the log
suggests recalibrating when it loads such a file, and recalibrating
once fixes it.
Input mapping
The keyboard also stands in for a controller, on two independent mappings so one keyboard can drive a two-player setup (see Controller ports). The menu’s Input Mapping... item edits both.
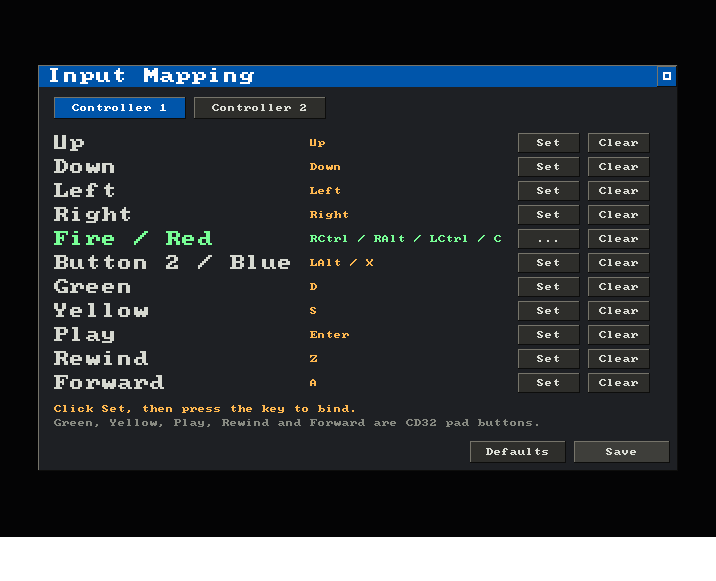
Editing the first keyboard mapping, with the Fire row armed for capture.
Pick the mapping with the Controller 1 / Controller 2 tabs, then Set on a row and press the key to bind (Escape cancels that row without closing the panel). Clear unbinds a control entirely, Defaults restores the built-in layouts, and Save writes the map and applies it to the running machine. Closing the panel without saving discards the edits.
A control may hold several keys, and they OR together: fire ships bound to
Right Ctrl, Right Alt, Left Ctrl and C, so compact keyboards without the
right-hand modifiers still work, and releasing one alias while another is
held keeps the button down. Binding a key removes it from wherever it was
before -- including from the other mapping -- so the two controllers can
never end up fighting over one key.
Saved maps live next to the gamepad calibrations, in
~/Documents/Copperline/keymap.toml (same per-platform locations as above).
Deleting the file restores the defaults.